Requirements:
Computer Running Windows 7,8,8.1,10 or Windows Server 2008 and Newer
4 GB of RAM
.NET Framework 3.5
.NET Framework 4.5
SQL Server Express (https://download.microsoft.com/download/4/1/A/41AD6EDE-9794-44E3-B3D5-A1AF62CD7A6F/sql16_sp2_dlc/en-us/SQLEXPRADV_x64_ENU.exe)
SQL Server Management Studio
Recommendations:
Static IP Address (Can be obtained from ISP)
1. Install SQL Server
- Download SQL Server from Microsoft (https://download.microsoft.com/download/4/1/A/41AD6EDE-9794-44E3-B3D5-A1AF62CD7A6F/sql16_sp2_dlc/en-us/SQLEXPRADV_x64_ENU.exe)
- Install SQL Server Express
- Install SQL Server Management Studio from the SQL Server Package or: https://go.microsoft.com/fwlink/?linkid=2043154
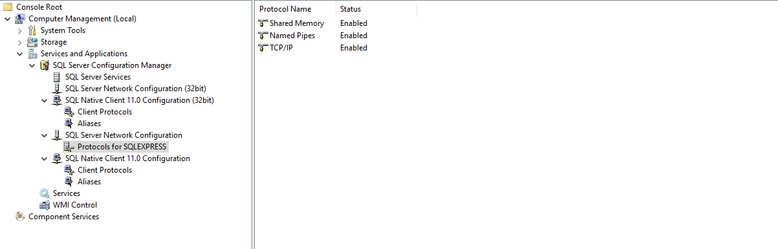
2. Configure SQL Server Configuration Manager to allow TCP and Enable SQL Server Browser
- Start SQL Server Configuration Manager by searching for it and starting or edit in local Computer Management under MMC
- Open SQL Native Client Configuration - Open Client Protocols - Verify TCP/IP Says Enabled - If it does not right click on TCP/IP and press enable
- Open SQL Server Network Configuration - Open Protocols - Verify TCP/IP Says Enabled - If it does not right click on TCP/IP and press enable
- Open SQL Native Client Configuration (32bit) - Open Client Protocols - Verify TCP/IP Says Enabled - If it does not right click on TCP/IP and press enable
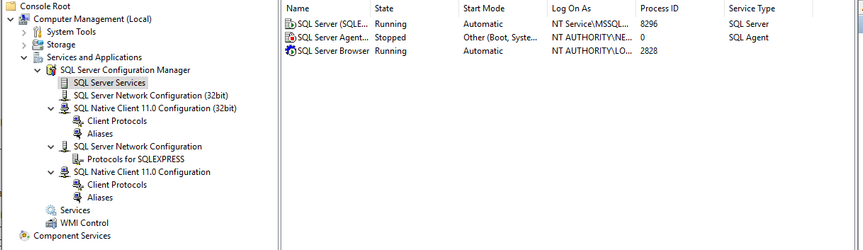
- Open SQL Server Services - Right Click on SQL Server Browser - Go to Service Tab - Click on start mode and switch to automatic - Click Apply
- Right Click on SQL Server - Click Restart
- Right Click on SQL Server Browser - Click Start
3. Import NTL Studio Database into SQL Server
- Open SQL Server Management Studio
- Connect to the Correct Database
- Once Connected Right Click on Databases - Go to Restore Database
- Click on the bubble that says Device and then the 3 dots at the end of the text box
- Click Add and Select the Directory that your Backup is in - If the Backup does not appear it may not be named correctly with a .bak extension
- Press OK Until you get back to the Restore Database Window, it should now recognize a database
- If a database is recognized you can press Ok to restore
- Your Database should now be imported
4. Install NTL Studio
- Take your NTL Studio folder and place the Contents Under Program Files (x86) in a folder called NTL Studio
- Create Shortcuts on the Desktop for Management and Distribution
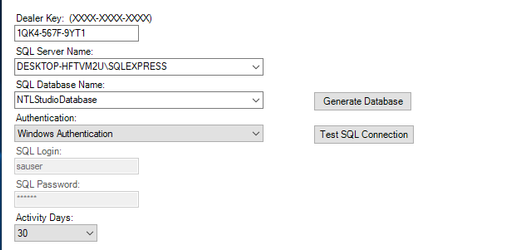
- Start NTL Studio - It will give you an error the first time because it is not connected to any DB
- Select the SQL Server you just installed along with the database name - if it does not show up most likely there is a problem with the SQL Server setup
- Press Ok when the settings are correct and Restart NTL Studio
5. Change Router and Firewall Settings (Required For Connect-Backs)
- Forward port 3002 on your router to the IP address of your NTL Studio computer on port 3002 (Can be done under port forwarding on most routers)
- Permit TCP Port 3002 on the Computers Firewall
- Add a Static Reservation on the router for your NTL Studio Computers IP Address
6. Verify NTL Studio works by connecting a unit
- Open NTL Studio - you shouldn't get any errors when opening
- Try connecting directly to a unit and doing a connect back to verify that everything works - in order for a connect back to work you have to have distribution open as well
- If you have any problems try troubleshooting with the articles in this knowledge base