/
How to Install iConnect Studio
How to Install iConnect Studio
- Tyler Stapleford (Deactivated)
- Chris Webb
Owned by Tyler Stapleford (Deactivated)
Last updated: Oct 06, 2020 by Chris Webb
Requirements:
- Computer Running Windows 7, 10 or Server 2008 and Newer
- Dual core or grater CPU
- 4 GB of RAM
- 80 GB or greater Hard Drive
- .NET Framework 3.5
- .NET Framework 4.5
- SQL Server Express
- SQL Server Management Studio
Recommendations:
- Static IP Address (Can be obtained from ISP)
Notes:
- Windows 10 is not compatible with our TCA modem and will only work with iLink units.
- The latest version of our software only support iLink and TeLink 700 units.
1. Install Prerequisites
- Install .net 3.5 from: https://www.microsoft.com/en-us/download/details.aspx?id=21
Install .net 4.5 from: https://www.microsoft.com/en-us/download/details.aspx?id=30653
- Install DirectX from: https://www.microsoft.com/en-us/Download/confirmation.aspx?id=3
- Install SQL Server Management Studio from: https://docs.microsoft.com/en-us/sql/ssms/download-sql-server-management-studio-ssms?view=sql-server-ver15
- SQL Server Express
- Windows 7 - Download and install SQL Server from Microsoft from: https://download.microsoft.com/download/4/1/A/41AD6EDE-9794-44E3-B3D5-A1AF62CD7A6F/sql16_sp2_dlc/en-us/SQLEXPRADV_x64_ENU.exe
- Windows 10 - Follow: https://learnsql.com/blog/how-to-install-sql-server-2017-windows
Set the SA password to: sauser (step 13) - optional
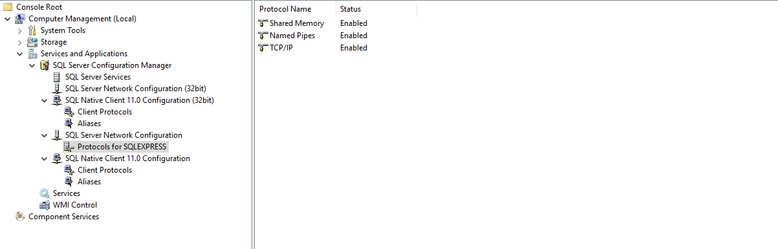
2. Configure SQL Server Configuration Manager to allow TCP and Enable SQL Server Browser
- Start SQL Server Configuration Manager by searching for it and starting or edit in local Computer Management under MMC
- Open SQL Native Client Configuration - Open Client Protocols - Verify TCP/IP Says Enabled - If it does not right click on TCP/IP and press enable
- Open SQL Server Network Configuration - Open Protocols - Verify TCP/IP Says Enabled - If it does not right click on TCP/IP and press enable
- Open SQL Native Client Configuration (32bit) - Open Client Protocols - Verify TCP/IP Says Enabled - If it does not right click on TCP/IP and press enable
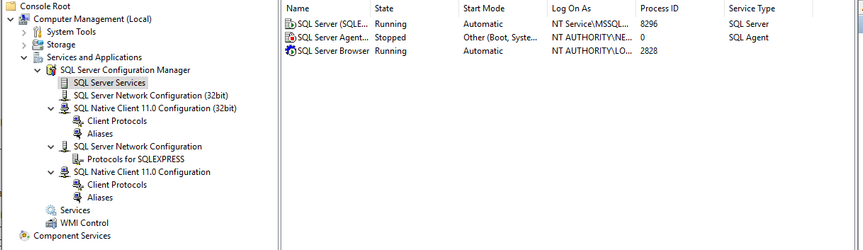
- Open SQL Server Services - Right Click on SQL Server Browser - Go to Service Tab - Click on start mode and switch to automatic - Click Apply
- Right Click on SQL Server - Click Restart
- Right Click on SQL Server Browser - Click Start
3. Import NTL Studio Database into SQL Server
- New Database
- Follow the steps from step 4(Install iConnect Studio), sub-step 4
- Restore Existing Database
- Follow the "How to Restore Your SQL Database" section from: Backing up/Restoring Your NTL Studio Database
4. Install iConnect Studio
- Download iConnect Studio from: iConnect-Installer-2017-78.zip
- Unzip and run "iConnect Studio Installer.exe"
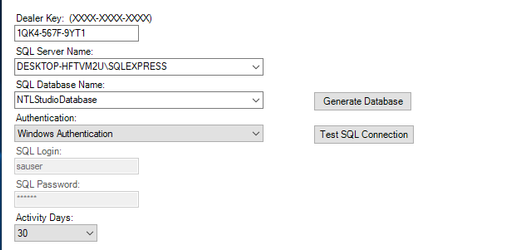
- Start iConnect Studio - It will give you an error the first time because it is not connected to any DB
- Select the SQL Server you just installed along with the database name - if it does not show up most likely there is a problem with the SQL Server setup
- If you are starting with a fresh database, Click 'Generate Database' then open the "SQL Database Name" drop down and look for 'NTLStudioDatabase'
- Press Ok when the settings are correct and Restart NTL Studio
5. Change Router and Firewall Settings (Required For Connect-Backs)
- Forward port 3002 on your router to the IP address of your NTL Studio computer on port 3002 (Can be done under port forwarding on most routers)
- Permit TCP Port 3002 on the Computers Firewall
- Add a Static Reservation on the router for your NTL Studio Computers IP Address
6. Verify iConnect Studio works by connecting a unit
- Open iConnect Studio Management & Distribution - you shouldn't get any errors when opening
- Try connecting directly to a unit and doing a connect back to verify that everything works - in order for a connect back to work you have to have distribution open as well
- If you have any problems try troubleshooting with the articles in this knowledge base
, multiple selections available,
Related content
NTL Studio
NTL Studio
Read with this
NTL Studio will not connect to SQL Server or asking for database when opened
NTL Studio will not connect to SQL Server or asking for database when opened
More like this
Microsoft .NET framework unhandled exception error: Invalid object name 'Unit'
Microsoft .NET framework unhandled exception error: Invalid object name 'Unit'
More like this
Firewall concerns (NTL Studio)
Firewall concerns (NTL Studio)
More like this
Microsoft .NET framework "A network-related or instance-specific error..."(Unable to Connect To Database on Startup)
Microsoft .NET framework "A network-related or instance-specific error..."(Unable to Connect To Database on Startup)
More like this
Unable to recieve connect-backs on port 80
Unable to recieve connect-backs on port 80
More like this